Showing posts with label Snacks. Show all posts

Sunday, March 30, 2014

Udikina Panasa ginjalu- Boiled Jackfruit seeds

Preparation time: 30 minutes

Ingredients:
1 cup Jackfruit Seeds
15 cups water

Method:
Place the jackfruit seeds and water on medium-high heat and let it reach a rapid boil. Slowly, the water reduces & turns dark brown from taking the colour from the skin of the jackfruit seeds. Also, one can smell a distinct smell, let me call it the  'boiling jackfruit seed' smell. To be honest, it smells kind of yucky if you are not used to it.  
It takes around 30 minutes for the seeds to soften. Prick with a fork to test, if the fork goes through, they are done. Drain the little water that remains. Remove the outer tough waxy peel from the seeds and consume the seed within.

Jackfruit seeds can be found in the unripe green jackfruit and also in the sweet ripe yellow jackfruit. They are a rich source of protein, starch, B vitamins and are also consumed along with the green jackfruit in a soupy curry/koora. Their texture is similar to chestnuts. 

Trivia
Each jackfruit aril has a single seed inside, ripe arils are very sweet and consumed as fruit. The seeds are a healthy food that needn't be discarded after consuming the fruit. 
Ripe jackfruit arils are sweet as honey & absolutely irresistible, delicious! They are rich in minerals, Bcomplex, anti-oxidants. However, they too have a kind-of-rotten aroma if you are not familiar with it :D 


Saturday, March 29, 2014

Shredded coconut with honey

Ingredients:
Shredded coconut
Raw honey, Jaggery or Sugar

Method:
Combine the coconut & honey (or jaggery) in a bowl.
Enjoy!!

Trivia:
The other day, I was super famished, suffering a severe migraine and ended up eating biscuits, without realizing that there was fresh scraped coconut in the fridge!
This is a nutritious quick pick-me-up snack if you are really really hungry like I was, or want something yummy to munch on. A pack of frozen shredded coconut in the freezer always comes handy at such times, it can thaw quickly.
You might wonder why I posted this silly snack on our blog. Well, I was really looking for something quick & nutritious and it always helps to be reminded ;-)

Thursday, March 27, 2014

Sabudaana Khichdi- Sauteed Sago pearls

(Above: Prepared in the Gujrati style)
Serves 3 as a light meal. Preparation time: 10 minutes.

Ingredients:

2 rice cooker cups Sabudaana, called Saggubiyyam in Telugu (Sago pearls)
Salt to taste
2 tbsp ghee
1 tbsp green chillies chopped fine

Additional ingredients: 

Marathi style:
2 rice cooker cups roasted peanut powder (roast peanuts & then powder them)
Red chilli powder to taste 

Gujrati style:
1 small onion chopped fine
1 tsp Jheera seeds

Method

Soak Sabudaana pearls overnight, the pearl should collapse into a soft crumbly paste when pressed. Soaking time depends on the quality/size of the pearls: 6 hours, or even 3 hours is okay for some beads.
Dry roast the peanuts (you can add a drop of oil), let cool and powder into coarse granules. 
The sago pearls swell & increase in volume, we need nearly an equal volume of peanut powder.

Marathi style
Heat ghee in a cauldron. Add green chillies. 

As they fry, drain the Sabudaana pearls in a colander. 
Mix in the peanut powder and red chilli powder, the peanut powder coats the Sabudaana pearls. Also add salt.

When the green chillies brown, add in the peanut coated Sabudaana pearls. Stir well & cover. Cook until the Sabudaana pearls turn translucent. Cook longer if you want the pearls fried. (5 to 10 minutes)

Gujrati style

Heat ghee/oil in a cauldron. Add jheera, when it splutters, add the green chillies, onion & salt. 
When they brown, add the drained Sabudaana pearls. Stir, cover & cook until the pearls turn translucent. 

Trivia:
I learnt the Marathi recipe from my mother-in-law, having spent years in northern Andhra Pradesh (should I call it northern Telangana now?) on the border with Maharashtra, my mother-in-law is familiar with Marathi cuisine and has incorporated several of their dishes into her cooking over the years. She cooked it when she was visiting Summu in Jersey City, Summu's papa had a great time eating his mother's yumyum food while I assisted & clicked pics! 

I have seen the Gujrati style made by some Gujrati aunties I know, they used oil instead of Ghee though.
Both styles have their own unique flavours, I make according to my mood. 
Sabudaana is just starch, the addition of peanut powder makes it a better balanced meal by adding protein. I also like adding more vegetables (green peas, potato, bell peppers). Do try to cook this in Ghee, Ghee lends an amazing flavour to this dish and I am a ghee addict :-)
I never knew Sabudaana could turn out so delicious, I absolutely loathed it as a child, as I only knew watery gummy Sabudaana gruel, a yucky preparation eaten with yogurt when one got the runs LOL!!
Then I discovered this yumyum Khichdi, which reminds one of the flavour of saggubiyyam vadiyalu!
This is a quick, delicious snack which can be had for breakfast or a light dinner. 

Wednesday, March 21, 2012

Baby corn Manchurian


Ingredients:

Baby corn: 8 oz can
All purpose flour/Maida : 1.5 cup
Corn flour: 3/4 cup
2 Garlics chopped
Ginger chopped
6 Green Chillies chopped
Salt 1 tsp
Red chilli powder 3/4 tsp
1 Onion chopped
2 tbsps Ketchup

Procedure:

1. Add All purpose flour, corn flour, salt, ginger, garlic, few of the green chillies, and red chilli powder in one bowl. Make semi solid batter by adding water to the mixture.
2. The batter should not be too watery. The consistency should be thick enough to coat the baby corn and stick onto it.

3. Heat 2-3 tbsps oil in a deep vessel on medium hea
t. Wash and dip the baby corn in to the batter and deep fry in the oil.
4. Once you dip a few baby corn in the oil, simultaneously, they have a tendency to stick together. So, make sure to keep them separated while they are frying.
5. Fry them till they turn crispy and brown. Place them on a paper towel when you remove them from the oil.
6. After all the baby corn have been fried, heat 1/2 a tbsp of oil in a pan and add the rest of the green chillies. Also, add the chopped onions and saute them. The onions need not turn brown, just cook them till they turn translucent.
7. When the onions are cooked, add the ketchup along with some red chilli powder if you would like to make it more spicy.
8. Add the fried baby corn into this sauce and toss them till they are evenly covered with the sauce/ketchup.
9. The Baby corn Manchurian is now ready to eat as a starter or a snack.

Note: You may also add; green peppers or spring onions before you add the ketchup in step 7.
Also, the same recipe can be followed by using Cauliflower or Paneer (Cottage cheese) in place of the baby corn.

Wednesday, November 9, 2011

MoMos with Yagya Aunty

After Alma my Iranian neighbour left the apartment in moved Prashanti. Nepali, just out of college and into her first job, she makes for yet another wonderful neighbour. True to her name she is calmness personified. Meeting her and her friends and family, all the Nepali women seem to me to be very charming and delicate. Along came the parents a-visiting and before long Yagya aunty and Ganesh uncle were performing poojas at our place! We were so blessed to have them around for Ganesha Chathurthi as well as for Deepavali. How often do you have people of the same faith move next door? In a place like DC!! Ever since of course, my eating habits have been pampered by aunty's cooking. Momos with tangy accompaniments are delivered hot-hot almost daily at my doorstep. After a long work day, this is welcome respite with Mint Tea.


Yagya aunty with Sandhya after a hard day's labour! Cooking Aloo and Tomato Achaar, Making Momos and Sel....


The single most important aspect of Momo making.
Wet the circular wrapper with water all around the edges, fill with filling.
Hold Momo in your left palm.
Join the fag end of the right side by wetting the edges, put your left thumb between the layers and with your right thumb and index finger create frills on one side, stick the inside edges.
Close the Momo.
Let the sides droop a bit, like a basket so that the Momo can sit in the steamer.
Steam in steamer for 5 to 10 mins. Remove, Cool, Serve.


Not just food, there was great entertainment too! We played Dumb Charades with other cousins who had come by to say bye to aunty-uncle who leave soon. Here the talented girls sing 'Dream Dream Dream...Dreeeeeeam'


Pouring Red Hot Chutney over Piping Hot Momos is one of the greatest blessings of life....


This is how they should look when they are done, a bit shiny and translucent. Common, make a few and impress your friends now!


Prashanti is making all the right poses in the kitchen with the steamer, picking on Momos to see if they are done.


As for the Aloo Achaar, it has Til/Sesame paste with Lemon juice and Timul - a fragrant black Pepper found ONLY in Nepal and in the Schezhuan province of China.


The Tomato chutney is hot and tangy more so because of the special kind of souring agent - a Lemon ie Lapsi - is used, that is found ONLY in Nepal.


The grated Choyote is mixed with grated Cheese/Paneer, Onions, Garlic, Ginger, Salt and Oil but you could substitute with grated Cabbage and grated Carrots too.


The Choyote filling has some water in it, it is alright to fill the Momo with that, don't be afraid of making it wet!


The Hong-Kong wrapper from the Korean market is thinner, the Shanghai one is thicker, it is generally found in the freezer section next to ready-made Momos.


Ingredients: Salt, Oil, grated Ginger, grated Garlic, grated Cheese/Paneer, grated Choyote, grated Onion

Tuesday, November 30, 2010

గోధుమ- బియ్యప్పిండి దోస: Goduma-Beyappindi dosa- Wheat & rice flour crêpes

Preparation time: 20 minutes. Serves: Upto 8 small dosas. 


Ingredients:
1 rice cooker cup- Whole wheat flour
1/4 rice cooker cup- Rice flour
1 Tbsp- Semolina (Soojia rava)
1/2 Tbsp- Chickpea flour
Salt to taste
1 Tbsp- Yogurt
2.5 rice cooker cup- Water

Method:
1. Mix all the ingredients, make sure to break up any lumps and let the batter stand for 10 minutes.
The batter should be of pouring consistency (explained further in step 3), add more water if it is too thick.

2. Place the pan on heat and smear oil. To test the heat, pour a drop of batter onto the pan, if it sizzles, the pan is hot enough to pour dosa.

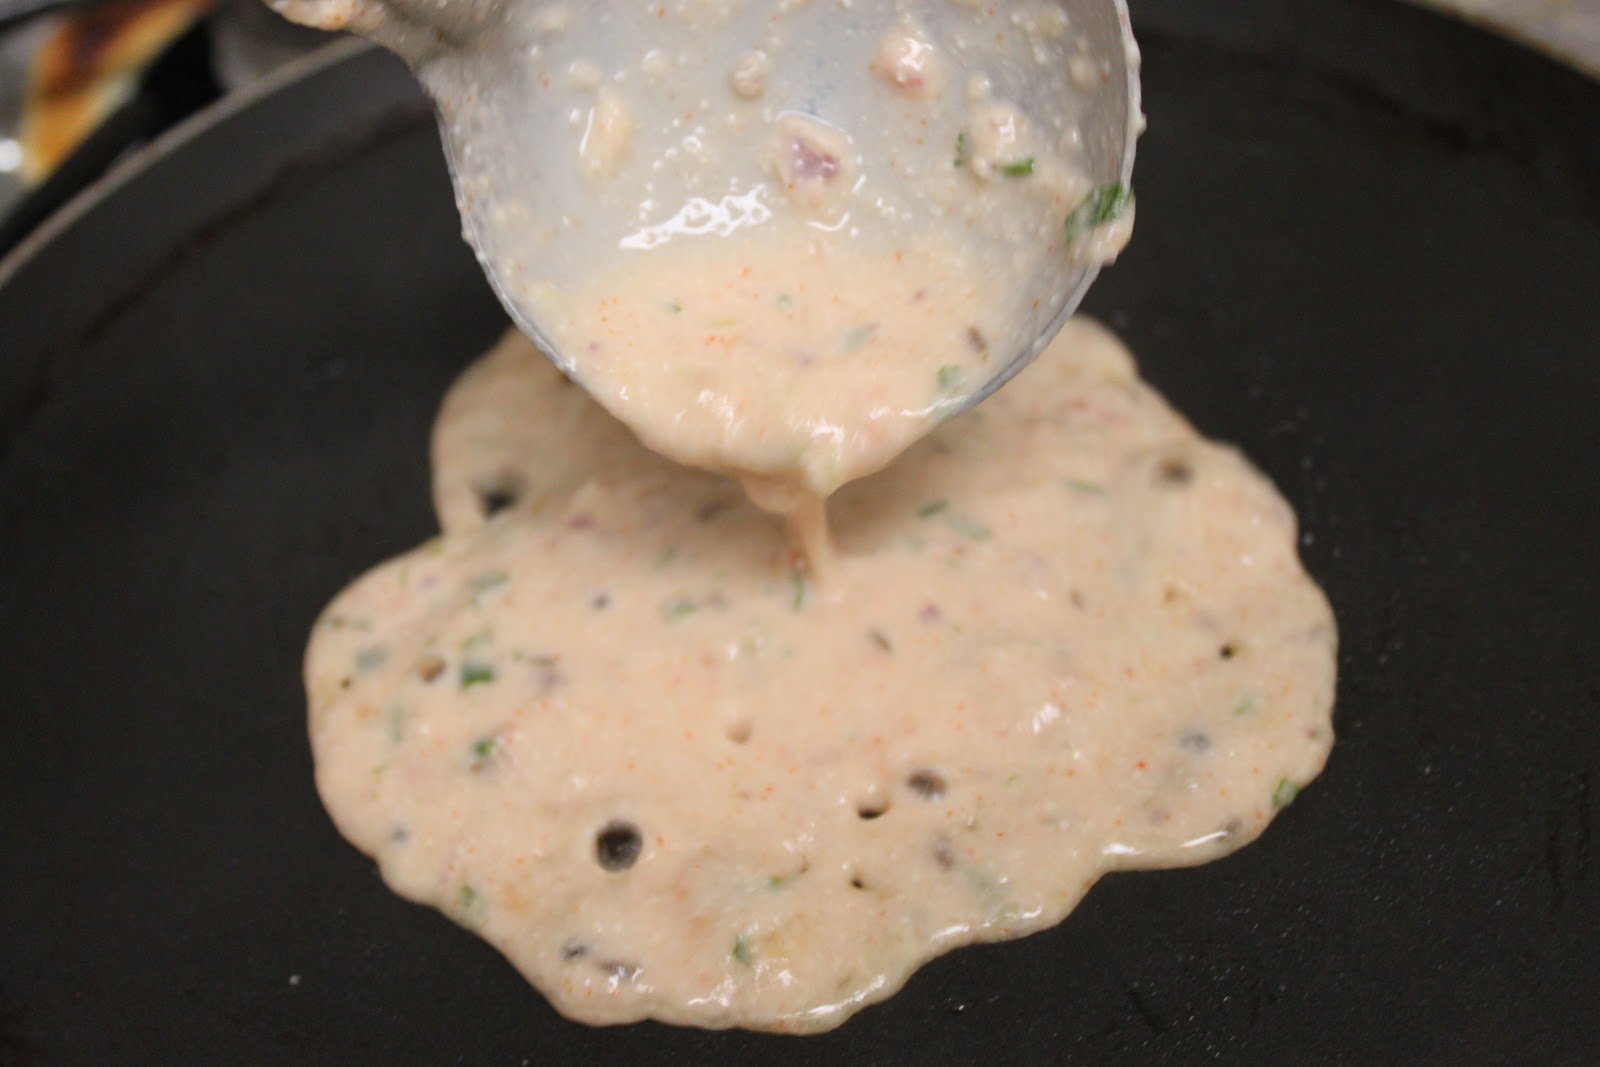
3. Mix the batter thoroughly and scoop into a ladle. Pour it onto the pan.

The batter sizzles upon touching the hot pan and flows/spreads out on its own into a circle. If the batter doesn't flow quickly but sits in a lump, it means it is too thick, add more water until flowing consistency is achieved.
4. Let the dosa cook until it is done. The surface of the dosa initially looks moist/wet/translucent, but turns solid & changes colour when it is done.
5. Carefully insert a spatula/turner under the dosa from its corners, to pry it off the pan. Also check if the underside looks browned. If the dosa is too fragile/breaking up/lumping up, it needs more time to cook.


6. When one side is totally cooked/browned, turn over the other side and let it cook.


Serve hot with any pacchadi or podi.

Suggestions:


Traditional cooks comfortably pour dosa onto a pan and then pour drops of oil onto its corners. My dosa gets stuck at the centre when I used this method. Hence, I invented this alternate technique of first smearing oil over the pan, and then pouring the dosa over the oil. This way, my dosa doesn't stick at the centre. You can settle on whichever method suits you best!

Variations:
1. This is a mix & match dosa. You can adjust the proportions of wheat flour/rice flour/semolina flour to taste. If the ratio of semolina flour-rice flour increased, this same recipe converts into Rava dosa recipe.
2. You can add vegetables into the batter. I added a blended tomato, onion and green chillies, and garnished with cilantro. (Make sure to adjust the water since blended vegetables add moisture to the batter). This makes the dosa more nutritious, tastier and appetizing to look  at. Alternatively, you can add fine chopped tomatoes & onions instead of blending.
3. If you want to make the dosa spicy, you may add whole cumin seeds, red chilli powder, turmeric or asafoetida as per taste.
4. If the dosa seems to continually break up for no reason:
- the pan might not be hot enough.
- you might be attempting to turn over the dosa while it is still uncooked.
- you may increase the amount of chickpea flour since it is a binding agent. However, it won't be necessary as wheat flour too has a binding nature.
5. If you add less water to the batter whereby it doesn't flow as smoothly, the dosa comes out thick like an Utappam.

Culture & Health:
Dosa is a standard breakfast/snack item in Andhra cuisine. This dosa has the added advantage of being very easy to prepare, needs little prior preparation, a kind of 'instant' dosa. Wheat flour/rice flour & vegetables provide a balanced diet. It can be made with very few drops of oil for the health conscious. Moreover, the batter flows easily into a circle & doesn't need practice/technique to spread unlike the minappindi dosa.

Trivia:
Wheat flour dosa is my peddamma's recipe, she makes it plain with a tiny bit of rice flour and salt, it is awesome in its simplicity!

Sunday, October 24, 2010

Ravva Dosa / Samolina Pan Cake


INGREDIENTS:

Ravva / Sujji / Semolina............1 cup.
Rice Flour.....................................1/2 cup.
Plain Flour / Maida.....................2 tbl sp.
Onion..............................................1
Green Chilly...................................4 or 5
Water...............................................4 cups.
Cilantro.
Salt.
Oil.

METHOD:

1.Mix ravva/semolina, plain flour and rice flour together with water. Keep aside for 1/2 hr.
2.Cut Onion into small pieces. Also cut green chilly and cilantro. Mix all tree together.
3.Now after the batter is soaked 20 minutes to 1/2 hr, add salt, mix well.
4.Keep frying pan on flame, heat it and smear with 2 t sp of oil. The pan must be oily and hot to get the dosas to be prepared easily.
5.Mix the batter well, and let the semolina settle at the bottom. Taking only from the top liquid form of the batter, using the ladle start pouring from out wards to in wards, making into form a round dosa. Do not spread it as we do for other dosas, where we pour batter in the center and spread it out wards.
6.Now sprinkle few of cut onion,chilly, cilantro on dasa. Let it cook and become little brown and crispy. You can check it lifting it from sides. Do not turn. Take out from fire into a plate.
7.As you are making these dosas, the liquid starts finishing. So, then you must add more water as per requirement and mix well. Now again taking the top liquid only prepare dosas again. If needed add little salt too.
8.Eat it hot with any chutney you like. They are simple to make. and no advanced preparation required.
9.This batter makes 10 to 12 dosas. Some times more, depending on the size you make.


Monday, October 18, 2010

గవ్వలు: Gavvalu- Sweet fried flour nuggets

INGREDIENTS:


Plain flour......................1cup.
Sugar................................1 t sp.
Jaggery.............................1/2 cup.
Semolina...........................1 tbl sp.
Oil.......................................deep frying.
METHOD:
1.Take myda(plain flour). Seive for no lumps. Add 1 t sp of sugar, and semolina. Mix nicely with hand ans with water make a fine dough.It should not be very tight or too soft. Make sure it is good. keep aside.
2.Take a fork or if available use the small board which is meant for the purpose of making gavvalu. Taking a marble size of dough press it on your three fingers with your thumb finger.
Take the fork in your left hand, on its back side press this and role it. It takes a shape of 'Gavva',Shell shape is formed. with few groves on its back side and a hole sort of a thing in the front. Prepare all in the same way. Keep them on a dry cloth.
3.Take jaggery, put little water, keep it on stove. After it melts slowly stir it. when it comes to boil, keep checking it. The syrup must not be over cooked. To get a correct consistency follow the test.
The syrup testing is, take a little in the ladle, drop into a bowl of some water. If the syrup is not spreading in the water,and you can take with fingers try to make a ball, it should be firm. It is called (ball consistency) 'unda paakam'.Keep the flame on low.Maintain the syrup consistency.
4.Keep oil in a pan , heat it. when it is medium hot, slowly drop these prepared(shells) gavvalu few at a time in to the oil. Remove them before they become dark in colour.Drop them in to the syrup. Stir it nicely, so that the syrup will go into the groves too. And take from the syrup, spread them in a plate to dry.
5.As and when you are frying, put them in the syrup, and take out, if the syrup start getting thicker, add little water and warm again to keep the consistency in same way, till all finished. 
6.These are good nick knacks for children to eat as much. They are not harmful like Candys.